Tag Archives: african american hair

Back!

It has been way too long!! Life simply took over. I am now a medical student and have been so busy, I’ve neglected my hair a bit. Well, I’m back on the saddle. Yes, I’ve reached waist length (a while ago, in fact) and most likely went past it. However, the ends were so thin, they were almost invisible. So around July of this year, I decided to cut it to BSL. My goal for the year of 2022 is to get back to WL and I’m doing that with braids as a protective style. Here is the plan:

Protective style

  • self-installed large knotless braids (X-Pression Kanekalon hair)

Length to Keep in Each Install

  • 3-5 months (re-braiding individual sections to refresh)
  • after each install, give hair small break then reinstall fresh set of knotless braids

Products

  • scalp: castor oil, Wild Growth Oil, Sulfur 8
  • hair: any leave-in, castor oil, whipped shea butter (home made)
  • shampoo: Nutrine Garlic Shampoo (unscented)
  • conditioner: Nutrine Garlic Conditioner (unscented)
  • deep conditioner: Alter Ego Garlic Mask Hot Oil Treatment

Regimen

  • everyday or every other day, apply castor oil/WGO/sulfur 8 mix to scalp
  • daily moisturizing of hair length with whatever moisturizer and oil on hand
  • shampoo hair in braids with diluted shampoo on weeks 1, 3, 5, etc
  • co-wash hair in braids with conditioner on weeks 2, 4, 6, etc
  • during hair break, apply henna
  • during hair break, shampoo and deep condition with hair mask

It’s a simple plan. By December 2022, barring set backs and an unfavorable growth cycle, I should have waist length hair. My ultimate goal is tailbone length hair and I hope to get there by December 2023! 😀

I’ve also been working on my skin care, which has been going well – thank goodness!

4 Years Post Last Relaxer!

Wow, it has been 4 years since I last relaxed my hair and about 1.5 years since my big chop!  I don’t have much to write about because I have much going on right now, but I plan to revisit this topic again in a future post! However, know one thing…I am really considering a (small) cut. I have heat damage and a “tail” forming. Not cute.

December 2014 Length Check (Silk Press) [PICS]

Another silk press? I know…what is wrong with me…

Without further ado, my official length check pic for the end of 2014 taken on December 24th, 2014:

 wpid-20141224_185605.jpg

And the comparison shot between September 3rd and December 24th 2014:

wpid-photogrid_1420099206568.jpg

I will unofficially claim MBL. It just doesn’t feel like it’s MBL and my ends are thinner than I’d like; I’ve been urged by others to claim MBL, hence the “unofficial” claim. I did not trim my ends this time around like I did in September.

One positive thing I do notice with the comparison photo is that it looks like I’ve retained/grew more hair in this four month period than I did my last comparison photo, which was from January to May 2014:

wpid-photogrid_1401301745173.jpg

I must be doing something right!


Winners of 2014

henna (though I fell off after only 3 applications)

buns (as always)

growth aids (biotin, MSM, and silica)

Losers of 2014

hair boredom (dangerous things can happen when you’re “bored”

heat damage

mini twists (installation and take-down wreak havoc on my strands and takes too long)

The Middle of the Pack

sew-ins (I tried my first full sew-in in September. My experience was neither terrible nor great; however, I do see a lot of potential for this style…I’m getting another sew-in in February)

Things I Want To Focus on in 2015

thicker ends

protein treatments

henna treatments

more “stylish” protective styles (i.e. sew-ins)

consistent hair blogging and hair photo documentation

continue growth aids (biotin, MSM, and silica)

attaining waist length hair! 😀

Braid Out And A Note On Being DIY [PICS]

I took down my mini-twists yesterday and my hair is finally loose again. In preparation for a wash and deep conditioning, I doused it in my diy Shea butter mix and plaited it in a random mix of 6-8 different-sized twists and braids. However, after looking at a dozen and one Youtube videos on crochet braids, I decided against washing and deep conditioning my hair (I had already washed it while in twists two days prior to the take down, anyway) and redid my hair into 6  braids to stretch out the hair evenly in preparation for crochet braids, instead. I later decided to add perm rods at the end of  each braid just in case I wanted to rock a braid out for church (which I did today; Oh the compliments I received!) It would be the last time seeing my hair out and about for at least two months so today was my chance to “play”. If the crochet braids don’t work, I’ll go back to mini twists, which weren’t that bad of a protective style. I plan to start installing the crochet braids tomorrow…if I can just get to cornrowing my hair right. It is really hard getting someone to cornrow my hair. I am very particular with my hair (e.g., I don’t blow dry nor do I use combs/brushes), and then there is the fact that I have a lot of it. :/

What are crochet braids?

Awesomeness. Pure awesomeness. At least, I hope that’s what they’ll end up looking like when I’m done.

I don’t want to give anymore details. I wanted the crochet braids to be a surprise, but I got so excited about them so I gave myself the permission to gab just a little. 😉

Anywho, my hair today; it’s not as defined as it was earlier this morning but I still like it:

Right side
Right side

Left side
Left side

Back
Back

Full frontal. ;)
Full frontal. 😉


A note on being DIY (Do It Yourself)

My mom wants me to bottle and sell the products I make, since I pretty much am diy (do it yourself). I am diy partly because of my limited resources and mostly because I avoid silicones; almost every freakin’ store-bought hair product has silicone and I’m not talking about the “good” water soluble kinds, either. I can’t afford super expensive shampoos and conditioners, but being diy is super fun and you can fix things to your personal preference (for example, I noticed that prolonged and obsessive use of grape seed oil gives me serious elasticity to the point where I was getting worried and that henna kind of reverses it; I still use grape seed oil, but in moderation now). The best part of diy is that my build-up has decreased dramatically and my hair is a billion times shinier. However, I’m pretty sure there are company-made products that work well and are safe for optimal hair health. Last week, I used my boyfriend’s shampoo and conditioner (Aveda Shampure line) and they were divine (and silicone-free)! Don’t knock the big industry hustle, my friends. Just know your ingredients!

Let’s Do the Twist – The Mini Twists! [PIC]

So last week, on March 26th (Wednesday), I randomly decided to put mini twists in my hair. I’d washed and conditioned my hair two days prior and placed them in medium/big-sized twists (my second time doing twists of any kind since the big chop; the first time was right after I big chopped. See this post.) I don’t know if I was trying to do a twist-out (unlikely) or keep them in big twists. Anyway, I was watching the lovely Alicia James video on mini twists after spending literally hours on Youtube looking at videos of Senegalese and Havana twists – basically, twists that required added fake hair. However, after seeing the Alicia James video, I was inspired to just do twists on my own hair with no added hair. So I did.

It took forever.

On the first day, Wednesday, I spent like 15-16 hours and only got through 60% of my hair. Granted, I was taking my time and took breaks here and there. But still, that’s a lot of time. Thankfully, I had the On Demand function on my TV to keep me company.

On Thursday, I didn’t get much done, I think I spent 3 to 4 hours max, and on Friday, I sped through the rest by making the twists in the back bigger and forgoing neat parts.

I would say that the overwhelming majority of the time spent doing this style was on detangling thoroughly and making neat parts in the front of my hair. The actual twisting took like 10-20% of the work and time. Yeah, I gotta do better haha.

How I Did My Mini Twists 

– I did it on fully dry semi-stretched hair (I stretched my hair with medium-sized twists. Had I known I was going to do mini twists that week, I would have stretched my hair with braids, instead, and left them a little longer than two days for best stretched-out results).
– I used just water and my whipped Shea butter mix for moisture. (I’ll write about how I made my whipped Shea butter in a later post.  It was my second time making it, and it was actually successful, considering I hated the Shea butter the first time around, and I think it had more to do with the fact that I still had relaxed hair than the composition of the mix).
– If you’re doing two-strand mini twists, do not borrow hair from the other strand if you find that one strand is longer than the other, because it will make unraveling a lot harder! Knots and breakage galore!
– Patience.

I honestly think I just have a big head, and then there’s the fact that my hair is grazing BSL, if not already there. So doing mini twists may not take as long for you as it did me if your hair is shorter/less dense. My sister, during the beginning of her natural hair journey, did mini-twists a lot and they usually took anywhere from 4 to 6 hours to complete and they were tinier than what I have on now, but I would say she was between neck length and shoulder length during that period. She said it would take too long to do now since her hair is much longer. Lucky for her, I volunteered to do her mini twists for her in preparation for her Portugal trip in three weeks. Practice makes perfect!

I am not gifted with “styling hands” so there’s definitely room for improving my mini twist technique. I accept the challenge. 🙂

Excuse my homely appearance. This is my hair down and parted to the side just for the picture. I've been keeping it in a medium-high bun 99% of the time. These pictures were taken one day after completing the twists, yet it looks kind of "old" to me.
Excuse my homely appearance. This is my hair down and parted to the side just for the picture. I’ve been keeping it in a medium-high bun 99% of the time. These pictures were taken one day after completing the twists, yet the twists looked kind of “old” to me. I intend to keep them in for at least two more weeks.

Henna on my Head! [PICS]

I did it! I henna-ed!

What is henna? In my understanding, henna is a plant-based red-orange dye that “binds” to keratin (the protein in your hair and skin). I put binds in quotation because the active ingredient in henna, lawsone (or hennotannic acid), does not really bind to keratin, but simply coats it. Therefore, henna feels like a protein treatment with the difference that it coats the hair’s cortex rather than fill in the protein gaps. Anyway, since my hair is unprocessed and totally virgin (yay to being natural!), I feel like I really don’t need protein treatments. However, the benefits of henna are hard to ignore. Because henna coats the cortex, it makes your hair appear thicker over repeated applications, and it also makes it stronger (i.e. less prone to breakage).

Henna and color. I love my natural hair color. It is a rich almost jet black color. So I was nervous about applying henna, especially since I find reddish hair unflattering on most people. Of course, henna cannot make my hair red. In order to do that, I would have to bleach my hair first to rid it of it’s natural color, and then add the henna. Instead, what henna would do for someone with dark hair is give the hair a reddish glow underneath light. If you have gray or white strands of hair, the henna would act like highlights. Initially, I was not loving the subtle orange glow, but it died down some after a few days (it takes anywhere anywhere from 2 to 7 days after henna application is complete for hair to oxidize completely, which).

Henna on my head! So I henna-ed on Monday February 10th. Here is the step-by-step breakdown:

Sunday, February 9 (3-4pm) – Prep

  • I got my materials ready. Realistically, this should take less than 10 minutes of prep. It took longer for me because I was battling  between whether to use 100 grams of henna or 200 grams. I settled on 200. I figured that if I didn’t use it all, I could simply freeze the remainder for next time. (It turned out that I used all of it! My mixture was thick!)2014-02-09 15.08.27
  • Materials:
    – Cling wrap (a.k.a. saran wrap)
    – Lemon juice
    – Black tea leaves
    – Rajasthani henna (200 grams)2014-02-09 15.08.362014-02-09 15.09.28

    – Measuring cup (not shown)
    – Plastic bowl (glass/ceramic will work, as well. Avoid metal. While pure henna does not contain any metals, the acidic mix of the henna and lemon may react and tarnish some metals.)
    – Spoon (not shown; also, avoid metal)
  • I boiled about 4 teaspoons of black tea leaves in about three cups of water.  Next time, I will make a much stronger brew. Tea bags work, too. I was shopping in the “ethnic” food aisle at the supermarket because they were sooo much cheaper than your brand names, and I’m running on a budget. Of course, there are consequences. Because I can’t read Polish, I got leaves instead of bags. Ah well.
  • I measured out 8 ounces of the sieved tea and 9 ounces of lemon juice, and mixed them together. The mix should be warm and not hot.  The purpose of the lemon juice is to make the henna more acidic so as to strengthen the lawsone release. Here’s the science here: http://cthuliz.com/blog/?p=2624. The black tea is my lame hope at making the henna dye color less intense. Black tea also has the added bonus of reducing shedding since the caffeine in black tea blocks DHT from the scalp. DHT is a hormone that causes hair follicles to shrink, and, therefore,  less shedding. Some more on black tea and shedding: http://www.hairliciousinc.com/2013/01/black-tea-rinse-101-reduce-shedding.html
  • I added the lemon-black tea intermittently into the henna, and mixed the henna and liquid until it reached a Greek yogurt consistency. Mine was a little too thick, I realized. Next time, I will add more lemon juice/tea.2014-02-09 15.11.00 2014-02-09 15.30.56
  • When I finally got to the desired consistency, I covered the henna with the cling wrap, making sure there was no air inside. I added a piece of paper towel inside before doing so so I would know when the dye (lawsone) had been released. The paper towel should turn orange-red to let you know that the henna is ready.2014-02-09 15.41.20

Sunday 4pm – Monday 6am

  • I let the henna sit in a dark room-temperature cabinet for 14 hours. Unfortunately, I forgot to take a picture. The paper towel was a reddish/orange color, so dye release took place.
  • While I waited for the henna to sit, I pre-pooed my hair with coconut oil and olive oil. I let that sit for a few hours and washed my hair with a clarifying shampoo. I did not use any conditioner.
  • At around 6am, I began applying the henna to my hair. The process took roughly an hour. I took my time since my henna mixture was a little too thick.
  • After covering my hair with henna, I wrapped my head with saran wrap and then wore a hat on top of it.

Monday 6am – 6pm

  • The henna stayed on my hair for roughly 11 to 12 hours

Monday 8pm

  • By 8pm, I rinsed my hair out of all henna. I first leaned over a large sink to rinse out most of it. That took about 15 minutes. Afterwards, I took a shower and rinsed out the rest with conditioner. The whole rinsing out process (shower + sink) took about 30 minutes.

Overall, my henna experience was not that bad. Because I was overly cautious, the whole process was probably a bit overdone and a tad too long. And it was definitely nowhere near as messy as some people made it out to be.

Below is a quick comparison of my hair before and after henna. I don’t see much of a difference, honestly, but I’m sure that over time with repeated applications I will be able to. My hair on my right is a bit further on in the air drying process than my hair on the left.

wpid-PhotoGrid_1392936387730.jpg
Left: before henna on semi-wet hair | Right: after henna on semi-wet hair

After henna. Immediately after I rinsed out the henna (with regular conditioner), my hair felt dry. It wasn’t until I conditioned my hair a week later did my hair get back to normal. The dryness wasn’t crazy bad. To give a comparison, the Aphogee 2-step protein treatment made my hair wayyy drier.

I’ve yet to deep condition my hair, though, so I’m sure had I deep conditioned my hair after rinsing off the henna, my hair would have been back to normal immediately. I’ve decided to stop using my yogurt deep conditioner because I read something about yogurt reducing the effects of henna.

Anyway, would I do henna again? Yes! Once a month. 🙂

Shrinkage, Curl Pattern, and Afros

As a person who was told for pretty much all of her childhood that she had “tough” hair, I always imagined my curls to be super kinky and tight, and that it was undesirable. And then when I transitioned while in college, I put my hair in protective styles most of the time so I never truly got to know my hair.

Well, I’m getting pretty close to my hair and I can say we are getting along just fine. It’s way easier to manage than transitioning hair, but not as easy as relaxed hair. However, it’s easier than I expected, which is all that matters. It’s kinky and the curls range from 4a to 4c, but mostly 4a with a sizeable 4b/4c presence around the temple to ear area – not that these details matter given my end goal: an afro!! Wait ’til my mom hears this, lol.

Another thing I noticed is that I very rarely let my hair dry 100% unstretched. I don’t think I’ve ever done that, actually, even while transitioning. It had less to do with shrinkage and more to do with tangles. However, this weekend at a friend’s place, I took an unexpected cowash session (we were sledding in the snow and my hair was in a braid-out –> BIG MISTAKE! My hair literally froze!). There was absolutely nothing I could use because he doesn’t use hair products other than shampoo and conditioner nor does he use any skin products but body wash (I know – bizarre, right?!). So I allowed my hair to air dry after using just conditioner and the olive oil that I just so happen to have on me at the time. No twists. No braids.

And guess what?

It was beautiful.

It fell beautifully on its own, too. It was smaller than what I was used to with my braid-outs, but I loved it all the same. Perhaps even more.

In the past few weeks, I have been asking around online how to get an afro thinking that bantu knot-outs, twist-outs, and other “out” type stretched hair would get me there. Little did I know that simply air drying my hair in its natural state gave me the afro I had been seeking.

My main concern about my hair while it air-dried was that the shrinkage would lead me to unbearable tangles. Well, when I got home and re-washed my hair, it didn’t tangle that much (but more than usual, though). In fact, I’ve noticed that since I big-chopped, my hair does not suffer from SSKs and matting as much as I expected nor as much as my sister’s, which I’m starting to believe has a different texture from mine. It is to the point where I don’t even need to wash my hair in twists or braids like I needed to when I was transitioning. I just divide my hair in the middle and put them in ponytails. I then work with one half at a time. When I’m really lazy, I just do the whole hair at one time, but I’ve noticed that I don’t get products in as efficiently when I do it this way.

I think my obsessive hair practices are part of the reason why my hair and I are getting along so well (I hope to the hair gods that I’m not jinxing anything). Also, I don’t mind some tangles; it’s totally natural for kinky and curly hair to tangle, anyway. As long as my hair doesn’t mat, I’ll let these kinks dance along each other as much as they want! Oh yeah, I’ve ditched combs a couple of months ago. Best. Decision. Ever. Finger detangling is the way to go for me. I don’t plan on wearing straight styles in the near future, anyway.

I love Yagazie’s hair*. If I can just get the front of my hair to behave (i.e, have more shrinkage and less frizz), then I would be golden, but I honestly think it’s heat damage that is making it function weirdly.

Before you think I’m curl-idolizing or whatever, I like Yagazie’s hair because it doesn’t look like she cares about curl definition; she just lets her hair be. I’m starting to really care less about curl pattern, as well. In fact, I never cared about it in the beginning of my hair journey (if I’m relaxing my hair straight, why bother thinking about curl pattern?). I didn’t think much of it during my transition because my hair was always in a protective style. But towards the end of my transition and a little after the big chop, I started to care more than I should.

I’ve snapped out of it, though. My hair is impossible for me to adequately describe, anyway. All I know is that my ultimate goal is a BAA (Big A$$ Afro). Imagine all that hair falling over your face. It’s super sexy and mysterious, dontcha think?

Yagazie Emezi Afro


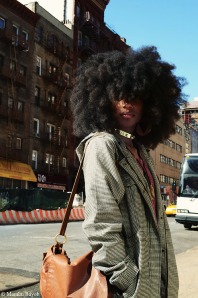
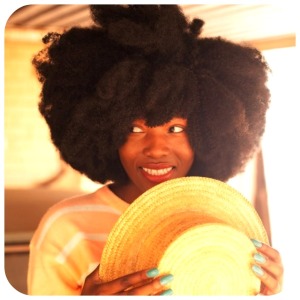
I want my hair like the pictures above but even bigger, with shrinkage and all because there’s no way I’m going to hurt my hands trying to pick out a BAA (also, I find unpicked afros to be very pretty; is that weird?). To achieve the look that I desire, my hair may need to grow very long.

Challenge accepted.

Protective styles and I will be well acquainted for the next few years.

#LoveYourNaps!

*Yagazie – For a description and pictures of her glorious hair, check out this profile: http://klassy-kinks.com/2013/12/06/klassy-kink-of-the-month/yagazie/. She’s also very active on social media. To find her, a simple google search should suffice.

Medication, Shedding Hair, and Growth Aids

I take medication that is famously known to dramatically increase the rate of shed hair at a very fast pace. I’m going to the doctor again to see what I can do about it but in the mean time, I have a remedy I’ve used in the past that has worked magic. My thinning edges have gotten me spooked. Tomorrow, I will take pictures of the growth aid mixing process. Some of you may not believe in growth aids but I definitely do. Internally, pretty much anything high in folic acid, iron, B vitamins, etc. will act as a growth aid on me because I am low on practically everything. So until I fix my insides, I’ll be using topical growth aids.

Anyway, here are some of the stuff I plan on mixing tomorrow.  These all have hair stimulating properties and I may decide not to use all of them at once.

– Jamaican black castor oil
– Ketoconazole/Miconazole Nitrate
– Sulfur powder
– Horse conditioner/Mega Tek (old formula)

I’m also taking an internal approach by starting my biotin and iron regimen. I should already be on iron because I’m anemic but I always stop because that stuff makes me feel very nauseous/sick.

I’m contemplating using henna and indigo after I big chop for strengthening purposes. (I’m 26 months post – woot!)

I know for a fact that Mega Tek and castor oil helps a ton for me. The jury is still out on sulfur and ketoconazole/miconazole nitrate. Don’t knock the power of growth aids.